Savings Plans Recommendation
To help users save maximum costs when using the service, AWS provides recommendations called Savings Plan Recommendations based on your past use of the service. You can use these recommendations to optimize your service commitment to reduce costs.
-
Monthly On-Demand Spend: Estimated On-Demand Spend based on usage during the selected period. It includes payments for Savings Plans that are active at the time of calculation. This value represents the Basic Spend for a month of On-Demand usage, based on past service usage and current Savings Plan commitments.
-
Estimated Monthly Spend: estimated spending based on commitments to use the service as suggested by Savings Plan. This value includes the recommended commits and any expected usage to keep the On-Demand Instance up and running which varies hour to hour during usage.
-
Estimated Monthly Savings: net monthly savings based on usage during the selected period when you purchase the recommended Savings Plans.
To access the Savings Plan Recommendation,
-
Log in to AWS Management Console and then open AWS Cost Management console at https://console.aws.amazon.com/cost-management/home
-
In the left navigation bar, under Savings Plan, select Recommendation
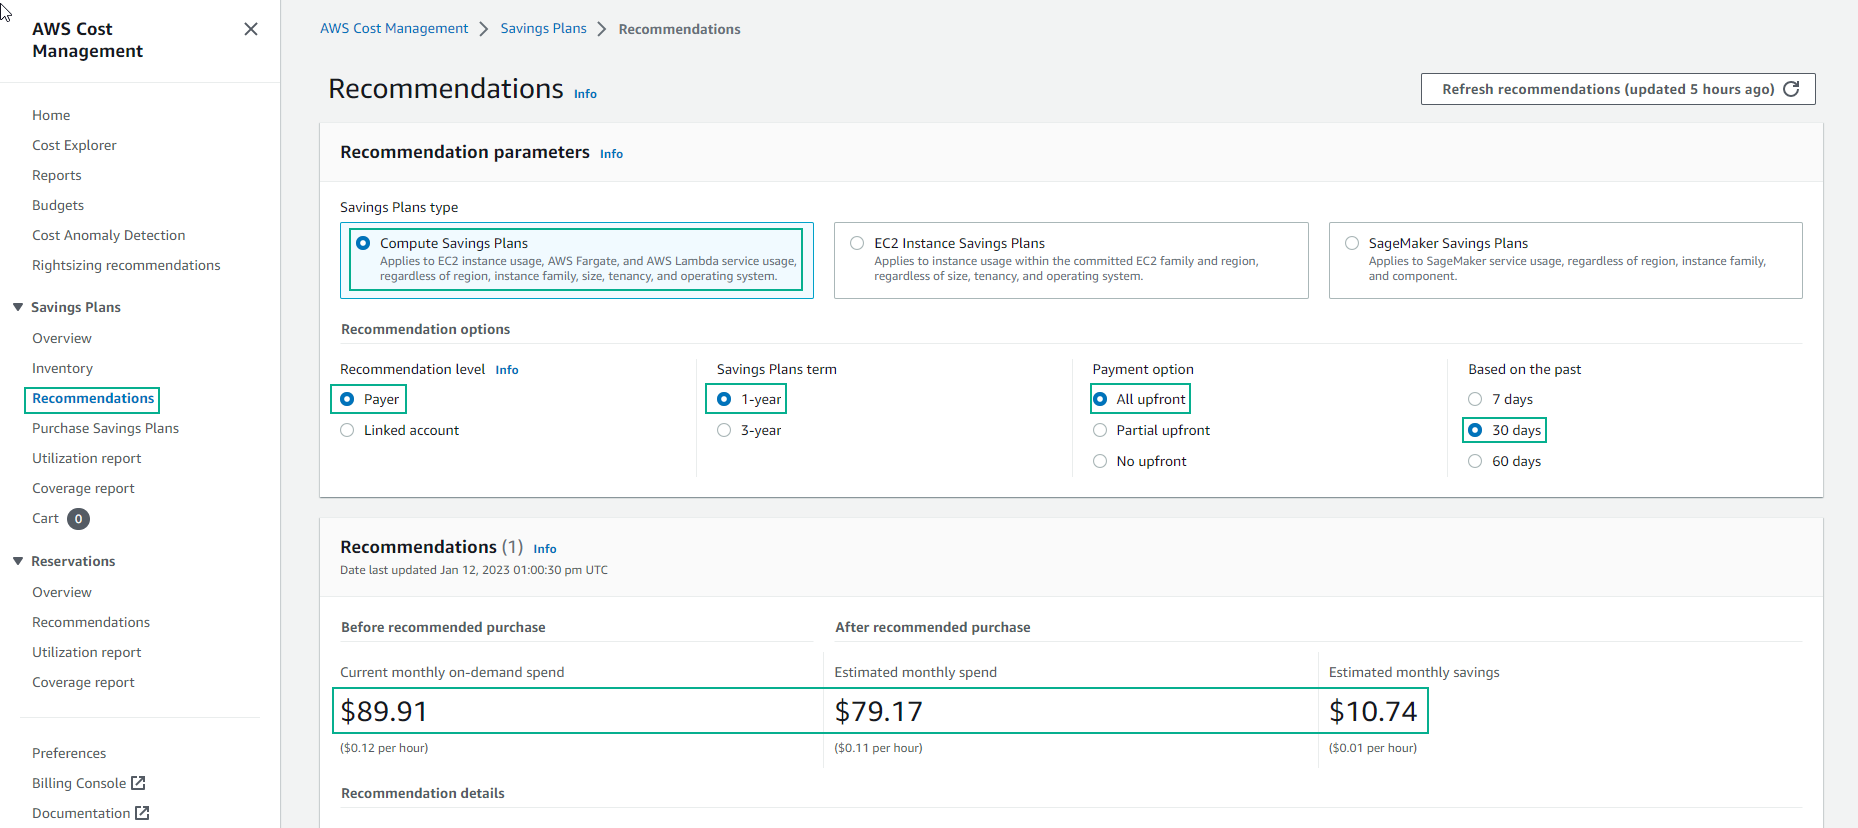
The Recommendation Savings Plan table shows the details of the Savings Plan options. You can also view Savings Plan Recommmendation information through the AWS Cost Explorer API.
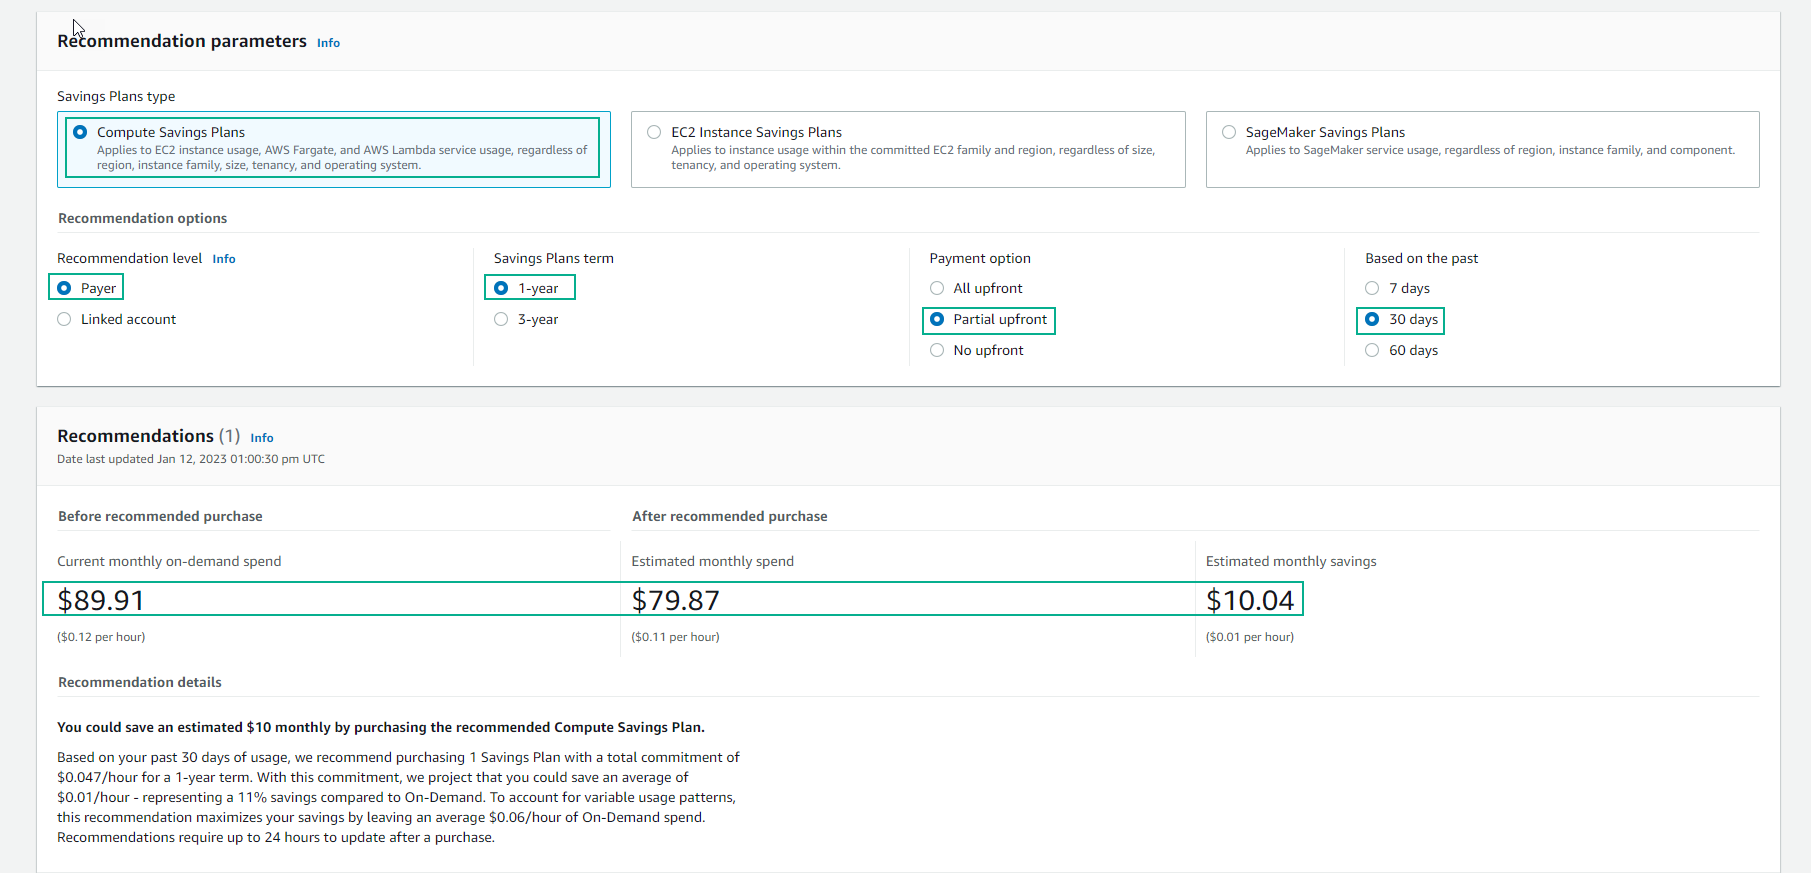
- For Partial upfront
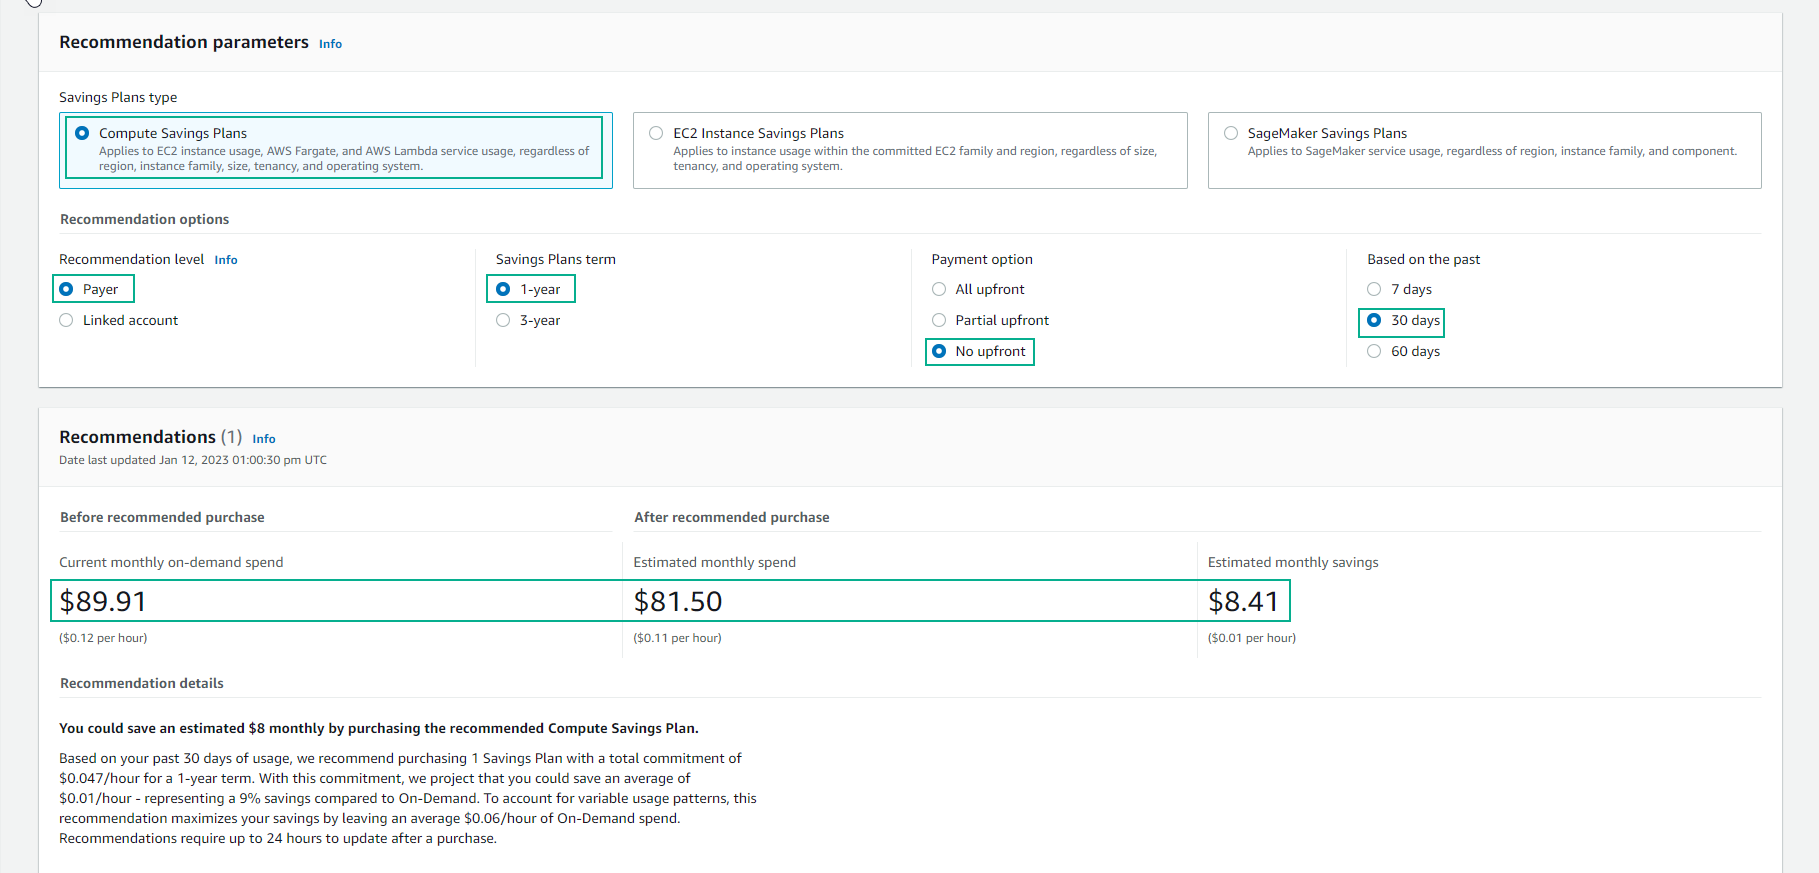
- For No upfront
Note: The steps below are only done when you want to buy Savings Plan based on the System’s Recommendations. To learn how to purchase a customized Savings Plan you can skip to Step 3.
Customize SP Recommendation
Custom information includes:
-
Savings Plan Type – Savings Plan Type. You can choose either Compute or Amazon EC2 Instance.
-
Savings Plan term – commitment term in years. Choose 1-year or 3-years.
-
Payment option – payment options for Savings Plan. It can be All-Upfront, Partial upfront, or No upfront.
-
Based on the past – the number of days in the past is used to calculate the savings proposal or not
-
Filter by – choose to determine which member account can view Savings Plan packages.
Specifically, the steps to customize SP Recommmendation are as follows:
-
Access the AWS Cost Management console at https://console.aws.amazon.com/cost-management/home
-
In the left navigation bar, under Savings Plans, select Recommendations.
-
In the Savings Plan type section, select EC2 Instance or Compute.
-
Select the term in the Savings Plan term section.
-
Select the payment type in the Payment option section.
-
Enter the number of days in the Based on the past section to calculate the SP recommendation based on that
-
(Only applicable to Management Accounts) Click the Linked Accounts tab, select the Account IDs you want that Account to see the SP offer.
-
(Optional) To pay, click the check box next to the desired SP package, then select Add Savings Plans to cart.
Recommended Savings Plan review on Recommendations page
Some cases when accessing the Recommendations page do not show any recommendations for Savings Plan. That’s for one of two reasons:
-
Firstly: it may be because AWS is not currently calculating any available outputs for Savings Plan.
-
Second: because the spending on using On-Demand service is too low, less than 0.1$/hour in the selected time period.
These recommendations are automatically calculated making it easy for you to need reminders to purchase optimal Savings Plans, and you can add the recommended Savings Plans for your Account directly to your cart.
To start paying for the Savings Plans recommended on the Recommendations page, take the following steps:
-
Sign in to the AWS Management Console and access the AWS Cost Management console at https://console.aws.amazon.com/cost-management/home
-
In the left navigation pane, under Savings Plans, select Recommendations.
-
In the options section of Recommendation, select Savings Plans type, Savings Plans term, Payment option, and lookback period.
-
In the Recommended Savings Plan table, click the check boxes next to the Savings Plans that you want to pay for.
-
Select Add selected Savings Plan(s) to cart.
-
To complete the payment, click Cart in the left corner.
-
At the Cart page, review the order and then click Submit order.
Pay Savings Plan on Purchase Savings Plans page
To pay Savings Plan for EC2 Instance:
-
Access the AWS Cost Management console at https://console.aws.amazon.com/cost-management/home
-
In the left navigation pane, under Savings Plans, select Purchase Savings Plans.
-
Under Savings Plans type, select EC2 Instance.
-
Select the Term Term, the area Region, and then choose the last name Instance or Instance Family.
-
In the Hourly commitment section, enter the SP run time
-
Select payment type Payment option.
-
If payment method Partial Upfront is selected, enter the amount to be paid in advance for SP.
-
(Optional) To put the Savings Plan on the waiting list to run the Savings plan in the future, make the Start date setting.
-
Select Add to cart.
-
On the Cart page, review the order, then select Submit order.
To pay Savings Plan for Compute:
-
Access the AWS Cost Management console at https://console.aws.amazon.com/cost-management/home
-
In the left navigation pane, under Savings Plans, select Purchase Savings Plans.
-
Under Savings Plans type, select Compute.
-
Select term Term.
-
In the Hourly commitment section, enter the SP runtime.
-
Select payment type Payment option.
-
If you choose to pay Partial Upfront, enter the amount to be paid in advance for SP.
-
(Optional) To put the Savings Plan on the waiting list to run the Savings plan in the future, make the Start date setting.
-
Select Add to cart.
-
On the Cart page, review the order, then select Submit order.
Put SP on the waiting list in Cart page
You can waitlist or schedule a Savings Plan payment. The date of activation of the savings plan can be exact to the second. Any upfront or recurring fees are charged only when the SP in the queue is activated on the selected date. You can cancel or remove this waitlisted SP any time before the start date.
To put SP on the payment waiting list, we perform the following steps:
-
Access the AWS Cost Management console at https://console.aws.amazon.com/cost-management/home
-
Add Savings Plans from Purchase Savings Plans or Recommendations page.
-
From the left navigation pane, under Savings Plans, select Cart
-
Select Savings Plans.
-
Select Set start date.
-
Select the date and time to run SP.
-
Click Confirm.
-
Click Submit order.
Review and complete the payment on the Cart page
Savings Plans shopping cart will keep commitments until you make the payment. To make a review and complete the payment from the Cart Cart page, follow these steps in turn:
-
Access the AWS Cost Management console at https://console.aws.amazon.com/cost-management/home
-
In the right navigation pane, under Savings Plans, select Cart.
-
Review the content according to the information below:
-
Type: Savings Plan type.
-
Term: commitment period in years. Choose 1-year or 3-years term.
-
Region: (only suitable for EC2 Instance Savings Plans) type of Region that you commit to use.
-
Instance Family: instance family (for example, M5, C5, R5, C5d, etc.) that you commit to use.
-
Purchase option: payment options. Options include All Upfront, Partial Upfront, or No Upfront.
-
Start date: determine the committed payment date and time. Default payment date is right at the time of order creation (Now).
-
Commitment: hourly commitment associated with Savings Plan and term.
-
Upfront payment: choose to prepay part or all of your order based on the payment option above.
-
Monthly payment: monthly payment for Savings Plans.
-
Total cost: total cost for the commitment level of Savings Plan package. It includes upfront costs and monthly recurring payments throughout the term of use.
-
Review the content in the Summary section:
-
Total Commitment: total cost for all Savings Plans currently in the cart, regardless of the start date or payment method.
-
Total upfront payment due now: Total upfront payment for Savings Plan with start date set Now.
-
Remove a Savings Plan from the Cart by selecting each item and then clicking Remove from cart.
-
To start over, and delete all items in the cart, click Clear cart.
-
To add a new commitment, click Add another Savings Plan.
-
Make payment, click Submit order.